목차
Run TestSuite
개요
작성된 TestSuite 클래스나, TestCase 들을 Ant나 Maven 같은 빌드도구를 사용하여 자동으로 수행할 수 있는 방법에 대해 설명한다.
테스트 결과 리포트가 생성되는데, 이는 Test Reporting에서 자세하게 설명하도록 한다.
설명
개발자가 단위테스트 클래스인 TestCase를 작성하고 나면, 개별적으로 테스트를 수행하여 결과를 볼 수 있다.
그러나, 일단 코드로 작성된 TestCase들은 빌드도구를 사용하여 자동화된 테스트를 수행할 수 있다.
빌드도구는 Ant와 Maven을 사용할 수 있으며, 이클립스에서는 각각 Ant와 Maven의 Plug-in을 사용하여 GUI 환경에서 테스트할 수 있고, CI 서버에 등록하면 동일한 프로세스를 서버단에서 수행한 뒤 CI 서버에서 리포트를 merge할 수 있도록 XML 파일을 제공할 수 있다.
Ant와 Maven 모두 다음과 같은 프로세스로 수행하면 된다.
- 테스트하기 위한 스크립트 작성 (Ant - build.xml, Maven - pom.xml)
- 이클립스 Plug-in을 이용하여 개발자 환경에서 테스트 수행
- 테스트 결과 XML 리포트 확인1)
- CI 서버에 등록하고, 테스트를 수행하도록 설정 후, CI 서버에 병합된 리포트 확인
✔ 여기에서는 CI 서버에 등록하고 확인하는 방법에 대해서는 설명하지 않도록 한다.
환경설정
- Ant, Maven Eclipse Plugin 설치
- JUnit Eclipse Plugin 설치
- TestSuite 작성을 위한 라이브러리 추가 (pom.xml) : Unit Test 작성을 위한 pom.xml dependency 설정 참고
사용법
Maven을 사용한 테스트 자동화
Maven을 사용하여 개인빌드를 하는 경우, 다음과 같이 테스트를 자동화할 수 있다.
- pom.xml 작성 : Test Automation을 위한 pom.xml 설정 샘플 : test와 같이 작성한다.
- m2eclipse로 테스트 수행 : Run As > Maven test 선택하여 실행한 뒤, Console View에서 BUILD SUCCESSFUL을 확인한다.

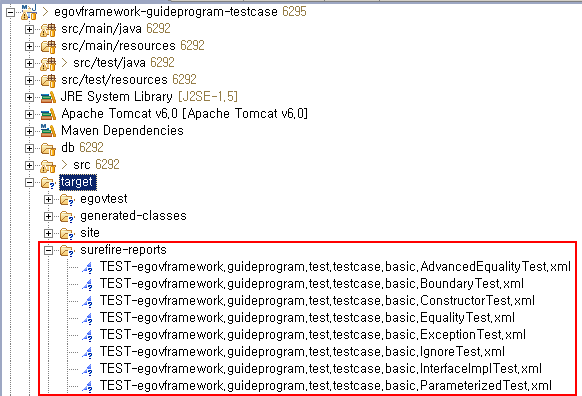
- XML 리포트 확인 : <reportFormat>xml</reportFormat> 항목에 xml, txt를 명시할 수 있으며, TEST-{TestcaseFullName}.xml 식의 파일이 생성된다.


Ant를 사용한 테스트 자동화
Ant를 사용하여 개인빌드를 하는 경우, 다음과 같이 테스트를 자동화할 수 있다.
- build.xml 작성 : Test Automation을 위한 build.xml 설정 샘플 : junit과 같이 작성한다.
- 이클립스에서 테스트 수행
- Console View에서 실행 결과를 확인한다.

- XML 리포트 확인 :
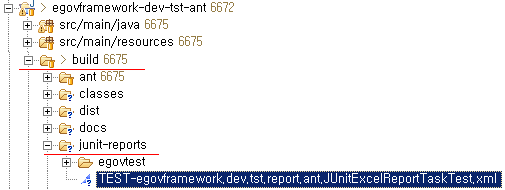
junittask에서<formatter type=“xml”/>항목에 xml, txt, brief를 설정할 수 있으며, 위의 예에서는 build/junit-reports 디렉토리 밑에 TEST-{TestcaseFullName}.xml 식의 파일이 생성된다.


샘플
Maven과 Ant의 Script의 작성 예는 다음과 같다.
Test Automation을 위한 pom.xml 설정 샘플 : test
test 수행을 위한 pom.xml 설정 샘플은 다음과 같다.
<build>
	<!-- 테스트를 수행하려면 goal이 'test'이다. -->
	<plugins>
		<!-- test -->
		<plugin>
			<groupId>org.apache.maven.plugins</groupId>
			<artifactId>maven-surefire-plugin</artifactId>
			<configuration>
				<skipTests>false</skipTests>
				<forkMode>always</forkMode>
				<reportFormat>xml</reportFormat>
				<excludes>
					<exclude>**/Abstract*.java</exclude>
				</excludes>
				<includes>
					<include>**/*Test.java</include>
				</includes>
			</configuration>
		</plugin>
	</plugins>
</build>
Test Automation을 위한 build.xml 설정 샘플 : junit
<property name="testreports.dir" value="build/junit-reports" />
. . . 중략 . . .
<junit forkmode="perBatch" printsummary="true" haltonfailure="yes" haltonerror="yes">
    <classpath refid="master-classpath" />
    <classpath refid="test-classpath" />
    <classpath path="${testbuild.dir}" />

    <formatter type="xml" />

    <batchtest fork="yes" todir="${testreports.dir}">
        <fileset dir="${testbuild.dir}">
            <include name="**/*Test.class" />
            <exclude name="**/Abstract*Test.class" />
        </fileset>
    </batchtest>
</junit>
참고자료
- Maven Surefire Plugin Home : http://maven.apache.org/plugins/maven-surefire-plugin/
- Maven Surefire Report Plugin Home : http://maven.apache.org/plugins/maven-surefire-report-plugin/
- Ant JUnit Task : http://ant.apache.org/manual/OptionalTasks/junit.html
- Ant JUnit Report Task : http://ant.apache.org/manual/OptionalTasks/junitreport.html
1)
각 빌드도구를 사용하여 테스트를 수행 결과 XML 파일이 생성된다. 빌드 결과의 Raw Data는 txt, xml 파일로 저장되며, 파일이 생성될 디렉토리는 설정할 수 있으나, Maven의 경우 디폴트로 target/surefire-report 라는 디렉토리 밑에 테스트 결과 파일들이 생성된다.